Figure 1.
Eureka!
In Principle Ten we learned about the Eureka Zone—that limited area in which displaced objects tend to be found. It was described as a circle whose center is the original location of the object, and whose radius is eighteen inches.
There’s a convenient way to determine your Eureka Zone; and that’s by using a Eureka-Stik. They’re easy to make—all you need is an ordinary ruler, the attachment, scissors, and tape. Start by printing out the following page and cutting out the attachment. Then:
1. Fold along dotted line.
2. Fold tab A over tab B.
3. Tape them together.
4. Slide attachment onto end of ruler.
5. Tape it there.
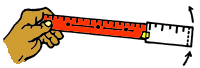
And lo, a Eureka-Stik. Align its zero mark with the spot from which the object is suspected of having been displaced. Now rotate the arrow (see Figure 1). The circle described is your Eureka Zone.
Inspect every inch of that zone—every nook and cranny. Check under and behind things. And don’t be fooled by vertical displacement—check the floor, too.
Remember, your Eureka-Stik can be helpful, but it’s not a magic wand. How you go about searching is what will make the difference.
